Popular Post

Tuesday, May 31, 2011

Learning Something New . . . Works for Me Wednesday

I did not make this cake:


You see, decorating cakes is not my forte.  Exhibit A and B.

But, you're never too old to learn, right? RIGHT?!?

Have you heard of MyCakeSchool.com?  It is a beautiful site filled with videos and tutorials all about making gorgeous cakes.

Melissa, the owner of My Cake School, is a natural teacher. Watching her videos makes me think, "Hey, I can DO that!"  It's like having a personal instructor right in your very own kitchen.  (Even though, I think I'd trade my kitchen for hers.) 

For $30 a year, members have access to 100's of videos (don't take my word for it; here's a list).  Learn everything from a basic crumb coat to gumpaste to buttercream flowers.

The video on scrollwork alone opened up a world of possibilities!
 
(And I can't wait to learn to make a pretty ruffle cake. I've been thinking about Amanda's ruffle cake since December!)

Guess what?  Melissa is offering TWO Bake at 350 readers year-long memberships!  Yay!  Come learn along with me! 

To enter: 

giveaway closed! Congrats to Rachel & Chelsea!!!
  • Leave a comment with a technique you would really like to learn (here's a list with some ideas)

Let's make some pretty cakes together! Works for me!

Papertake Weekly - Sketch Week


Hi everyone! I hope you were lucky enough to enjoy a 3 day weekend and that you had nice weather for the unofficial start of summer. It was actually snowing here on Saturday night, believe it or not! YUCK! We've had a very cool spring this year and I'm ready for some warmer weather! I just know that summer is going to hit hard when it finally gets here.  With it being Tuesday, that means it's time for a new challenge from Papertake Weekly! This week is sketch week! I love sketch week! Dawny is the sketch Queen!!  Since it's the last Tuesday in the month, that means we're being sponsored by the awesome Simon Says Stamp!!


For my card today, I used #377 Traveling Tilda (isn't she just the cutest little thing???) from the Bon Voyage collection at Magnolia-licious, along with #525 Spring Fence. I don't see the full size available right now, but you can get it in the mini version!! I changed it from a spring fence to a summer fence by just covering up the daffodils with some tiny flowers. They are colored with Copic markers, and Tilda is fussy cut and popped up for dimension. These yummy papers are from Raspberry Road and they're double matted with Bazzill card stock.   The flowers are from Wild Orchid Crafts and  I also added some Kaiser flat backed pearls. That lucious bow is made with May Arts Silk Ribbon from Stamp and Create.


So that's it for my card today! Sure hope you pop over to Papertake Weekly and check out all the amazing creations from the rest of the design team! Then we'd love it if you'd grab your paper and glue and join us in the challenge! Thanks so much for stopping by to see me today and hope to see you back again soon! Hugs!!

Monday, May 30, 2011

It does make me feel kinda sorry for the blackboard.

I was playing with a new Ipad at work yesterday and I asked the question, 'How can they improve on this, how can they make it any cooler? Are we ever going to reach an everything's-been-invented threshold?'

And then someone sent me this.


I guess that would be a no.


Sunday, May 29, 2011

For a great friend featuring a fun hAnglar image and a WINNER!!!


Happy Sunday everyone!  Sure hope you're having a fabulous weekend! It's been chilly and rainy here all weekend, so I've taken advantage by getting some crafting done.  Todays card features an adorable hAnglar image colored with Copic markers. 


The cardstock is Bazzill and the DP's are from Kay Miller Designs and Raspberry Road. I think I've put everything on this card except the kitchen sink! LOL! I used a doily cut with a die from Cheery Lynn Designs, the flowers are from Wild Orchid Crafts spritzed with Glimmer Mist,


The ticket is a stamp and die from Whimsy that I got from Bunny Zoe's Crafts, the banner was cut using my Cricut Expression using my Gypsy and Celebrations cartridge, and the little hearts on the banner are a byproduct of a Martha Stewart heart border punch edged in chalk ink. The pin was made using some beads from Michael's, and the ribbon is May Arts silk ribbon from Stamp and Create colored with a Copic marker to match.


I am entering this into the following challenges:
Lovely hAnglar only- dots
Just Magnolia and hAnglar & stAnglar Challenge Blog - Friends

And I have FINALLY drawn a winner for the Magnolia-licious blog hop! And the winner is......


And #8 is.................


Congrats Riet! Please send me your information so I can get your box of goodies out to you! Thanks to everyone that played!!  Enjoy the rest of your weekend! Hugs!

DIY Coke Icee


I don't know about you, but when I was a kid, there was only one flavor of Icee for me: the Coke Icee.  No cherry...and don't even get me started on the Blue Raspberry flavor.  It was Coke Icee or nothin'.

So, when I saw this recipe in the little booklet that came with my new ice cream maker, I had to try it.

You'll need: 4 cans of cold Coke and an ice cream maker.

Pour the cold Coke into the frozen bowl and process for about 20 minutes.

Have your glasses and straws ready.

Ta-da!  That's it!

Now, I think they might add a little something else to Icees, because it tastes close, but not exactly like the real thing.  But hey, Icees at home? I'll take it! 

{The little recipe booklet says you can make this with any soda, as long as it's not made with artificial sweeteners.}

So, if you're having people over for Memorial Day (or any day for that matter), give it a try.  I think I'm going to try Ginger Ale Icees next!

Friday, May 27, 2011

Peggy Loves Vintage "what's cookin'?"


Hey everyone! I'm sooooo glad it's Friday! And a 3 day weekend in the States as well! WOOHOO!!  The weather isn't going to be very nice (they're even talking snow for Sunday morning), so I'm planning on staying inside and getting some crafting done. My card today features another adorable vintage image from Peggy Loves Vintage.  All her images are so great for making a fabulous card quickly!  I printed her on Bazzill cardstock and cut her out from the background.  She's popped up from a circle Nestie. The DP's are from Nitwit Collections.


I paired her up with a sentiment from The Cutting Cafe set called What's Cooking. I love using Regina's sentiements with Peggy's images. For the horizontal panel, I used a Martha Stewart border punch, and then edged the vertical panel with some beautiful lace from Bunny Zoe's Crafts. That big beautiful bow was made with May Arts Silk ribbon from Stamp and Create, and the charm is from my stash, so I have no idea where I got it from


A slightly angled pic to help show some of the dimension of the card. Plus it gives you a little glimpse of the inside which is decorated to complement the card front. So that's it for my card today. Please visit Peggy Loves Vintage to see the thousands and thousands of vintage images that Peggy has available. Don't forget to visit her blog and sign up to follow her. She loves to give away free images! Thanks so much for visiting me today and hope to see you back again soon! Hugs!!

Wednesday, May 25, 2011

Triple Chocolate Muffins

 
Muffins = legally sanctioned cake for breakfast.  
{Please don't tell the First Lady.}

These Triple Chocolate Muffins may not be the most gorgeous, but, oh baby....warm from the oven with two kinds of melty chocolate chips?   They are pure decadence.

The day I made them, I ate one for breakfast, one for a mid-morning snack, 1.5 for lunch and one mid-afternoon.  {Muumuus will be all the rage this summer, right?}

Triple Chocolate Muffins

1/2 c. (1 stick) salted butter
1 and 3/4 c. unbleached, all-purpose flour
2/3 c. dutch-process cocoa (such as Hershey's Special Dark)
1 and 1/4 c. sugar
1 tsp. instant espresso powder
1 tsp. baking powder
1 tsp. baking soda
3/4 tsp. Kosher salt
1/2 c. bittersweet chocolate chips
1/2 c. semisweet chocolate chips
2 eggs
1 c. milk
2 tsp. pure vanilla extract
2 tsp. white vinegar

Line a muffin tin with 12 paper cups. Spray lightly with cooking spray. Preheat oven to 425.

Melt the butter; set aside to cool.

In a large bowl, whisk together the flour, cocoa, sugar, espresso powder, baking powder, baking soda, salt and chocolate chips.

In a separate bowl, whisk the eggs, milk, vanilla and vinegar until blended. Stir in the cooled, melted butter.

Add the wet ingredients to the dry ingredients.  Stir with a rubber spatula, just until blended.

Spoon into the prepared muffin liners...the cups will be very full. {Be sure to lick the spoon...this batter is SO yummy!}

Bake for 15-20 minutes until the muffins bounce back when pressed with a finger.  Cool on a wire cooling rack for 5 minutes.


Remove from the pan and let them cool just a bit longer.  Serve warm.

Confession: I have one small white plate. Once we started, kiddo would.not.stop.eating to let me take a picture of the melty insides of his on the pretty white plate.  Note to self: buy more white plates.

Tuesday, May 24, 2011

Papertake Weekly - Pale and Pretty Pastels


Hi everyone and happy Tuesday! Hope you're having a wonderful start to your week and that your weather is being nice to you! My thoughts and prayers are with all who are being affected by these terrible storms! Please stay safe!!! It's time for a new challenge from Papertake Weekly, and this week Dawny is asking for pale and pretty pastels!  We're being sponsored this week by Wendy over at Digital Delights by Louby Loo! For my card, I chose to use two of my new images from the Butterfly Dreams collection over at Magnolia-licious.  Diana has the most awesome store with the largest on-line selection of Magnolia stamps in North America!!  And I don't know what you think, but I seriously don't know how they do it!! Each new collection just keeps getting cuter and cuter! I used
#370 Tilda holding daffodil, #505 Stone pathway, and the swing is also Magnolia, but I can't find it in the store right now. If you're interested, please contact Diana.


The images are all colored with Copic markers. I have to admit, I don't do pale very well, so I think my coloring leaves a lot to be desired with this one. But I tried. LOL! The swing was masked to stamp the stone pathway over it, but Tilda was cut out and popped up for the dimension. I can tell I will be using the stone pathway a lot! The circle sentiment is from Lili of the Valley, the flowers are from Wild Orchid Crafts, and the papers are from Nitwit Collections.  The delicious ribbon is May Arts Silk ribbon from Stamp and Create.


That's about it for this one! Please be sure and visit the rest of my DT sisters over at Papertake Weekly to see all their gorgeous creations. Then we'd love it if you'd grab your paper and glue and play along with us! Thanks so much for stopping by to see me today, and hope to see you back again soon! Hugs!

If you're living in New Zealand....

....tomorrow night at 9.30 p.m you need to be sitting in front of TV1 watching Five Days in the Red Zone.

It's a doco following a team of police from Alexandra as they decamp to Christchurch on the day of the earthquake.

Compelling, funny and overwhelmingly heartbreaking.

Sunday, May 22, 2011

Further to my last post....

So there I was banging on last week about the extraordinary things us (supposedly highly evolved) human beings are doing in the name of beauty. Or in the name of retaining our youthful looks - but just getting it sensationally wrong.

And then in the weekend another example landed in my lap,well, turned up on my screen. For those who don't live in New Zealand, in the weekend a telethon was held to raise money for the Christchurch Earthquake Fund. And telethons being telethons they need celebrities, which is how Nicki Watson ended up back on our screens.

And just who is Nicki Watson ? A model, no longer married to millionaire Eric, and who used to turn up regularly in women's magazines and shows such as Celebrity Treasure Island because... she was a model and married to a guy who was worth about 250 million (but just not currently New Zealand's favourite son. But that's another whole can of worms. )

Last time I saw a picture of her she looked something like this. Just your run-of-the-mill beautiful model party girl divorced from a millionaire.
She's one of those creatures who is the result of some fairly stunning gene collision.

Anyhou, she's been out of the press of late. Apparently she's turned over a new leaf. Been living the quiet life, having turned her back on her party days and living in a rural community south of Auckland, helping out in the local beauty parlour.

So with that in mind I was reasonably surprised to see her looking like this.
She looks like she's been playing with knives.

Actually, that photo doesn't really show her face in all its glory. I've seen moving images of her and I can honestly report that the still image is more flattering cause it now appears her face has lost the capacity to move.

You may think I am making a good story of it but even commenter Esther pointed it out in my last post.

Which is a real shame - she was really attractive, now she just looks odd.

All in the name of beauty.

Saturday, May 21, 2011

Dosey Doe : Stamped Fondant Cookies

 
There's a little place we like to frequent called Dosey Doe.
It's a coffeehouse/restaurant/bar/music hall with a Texas flair. 

So, one night as I was sipping a Shiner, listening to Two Tons of Steel, my mind went to cookies.  I thought maybe "branded" cookies would be cool....2 D's for Dosey Doe.

It wasn't until I started making them, that I realized they looked like they could be for a place called The Double D Ranch, and that just sounds like a Texas version of Baywatch.

Let me give you the low-down on stamping fondant.  Apparently, rubber stamps are NOT something you want to have come in contact with your food.  Who knew?  So, use a piece of plastic wrap between your fondant and the stamp.

To make "branded" cookies, you'll need:
  1. fondant: homemade or Satin Ice (it's good!)
  2. corn starch
  3. rolling pin
  4. stamps
  5. Americolor Chocolate Brown food coloring
  6. small paintbrush
  7. fan paintbrush
  8. tray
  9. corn syrup
FIRST....don't get so excited over trying a stamp that you FORGET TO TINT YOUR FONDANT. I intended to tint the fondant light brown to look more like wood.

Roll the fondant out thin on a corn starch-coated surface.  Cut with the same cutter as your cookies.

 
Cover the fondant pieces with plastic wrap and stamp.


Place on a parchment-lined cookie sheet.


Paint the letters with brown food coloring with a small paintbrush. 


Using a fan brush, paint the wood grain on the fondant using Renee's technique shown here on University of Cookie.  The only difference being that you use the food coloring straight...no added water.

Let the food coloring dry.  To attach to the cookies, use a pastry brush to apply a thin layer of corn syrup to the back. Place on the cookie to adhere.

There ya go...."branded" cookies.  Yee-haw!

I'm excited to experiment a bit more with stamped cookies!  What would you stamp?

Thursday, May 19, 2011

Homemade Strawberry Pop Tarts

 
One reason I like running errands with kiddo is that, well, I just like having him with me. The other is that when I talk to myself in a store, it looks like I'm talking to him.

This is a big problem in a store like Williams-Sonoma.  I find myself "oooing" and "ahhing" and "isn't that cute-ing" all over the place.
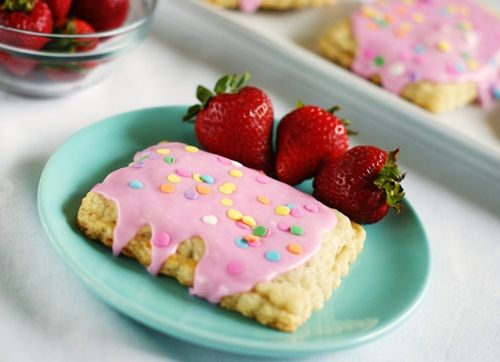
When I saw this....

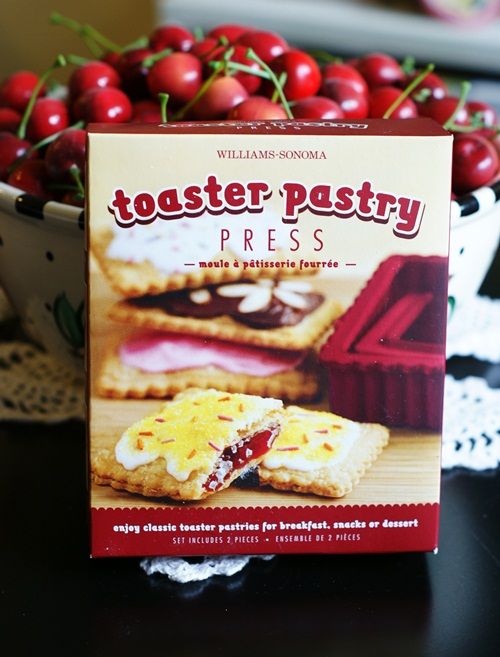
I ooo'd and ahhh'd and isn't that cute'd...and IMMEDIATELY picked up two (one for you, one for me). I think I might have startled the salesclerk working in the area.

These homemade pop tarts are really easy to make...and there is a recipe right on the back of the box.  My only tip for you is...make them the day before you want to serve them. There's a lot of chilling time and waiting time...so plan ahead. You do NOT want to start these when you are trying to get your kids off to school.

Homemade Toaster Pastries (Pop Tarts)
{adapted from Williams-Sonoma Kitchens}

2 & 1/2 c. flour
3/4 tsp. coarse salt
2 TBSP sugar
2 sticks salted butter, cut into chunks
6-8 TBSP ice water
strawberry preserves or jam
1 egg beaten w/ 1 tsp. water
1 & 1/2 c. powdered sugar
2 TBSP milk
pink food coloring
sprinkles

(If you don't have a food processor, combine these with a pastry blender.)  In a food processor, pulse the flour, salt and sugar a few times, until combined.

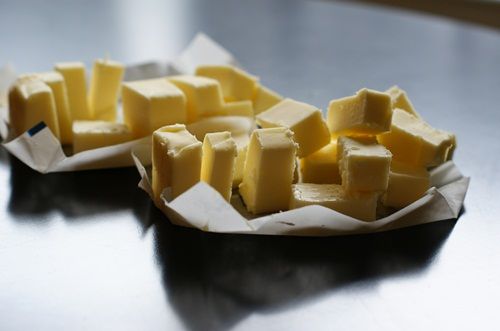
Add the butter, and pulse until the mixture looks like coarse meal.  Add 6 TBSP of ice water and pulse until the mixture holds together when squeezed.  Add more water, a teaspoon at a time, if needed.

Divide the dough in half, wrap in plastic wrap and refrigerate at least 2 hours, or overnight.

On a floured surface, roll the dough to 1/8th thick. Cut pieces with the large cutter (you will have 10-16 overall depending on how thin you roll the dough).  Place half of the cut pieces on cookie sheets that have been lined with parchment.
 
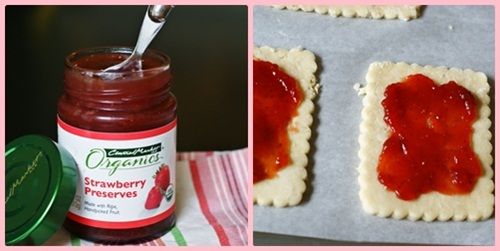
Spread 1 TBSP of preserves onto each piece, leaving a 1/2" border.  Brush the egg mixture along the edges.  Top each piece with one of the remaining pieces of dough.  Using the toaster pastry mold, press down with the small mold to seal.

Refrigerate for 30 minutes.  Preheat oven to 350.  Bake for 25 minutes or so, rotating the sheets in the oven halfway through.  Let sit on the sheets 10 minutes, then remove to wore cooling racks to cool completely.

Meanwhile, mix the powdered sugar and milk.  Adjust the thickness with more milk or sugar.  Add the pink food coloring.  Spoon onto cooled pastries and spread with and offset spatula.  Add sprinkles.  Let the icing set before serving.


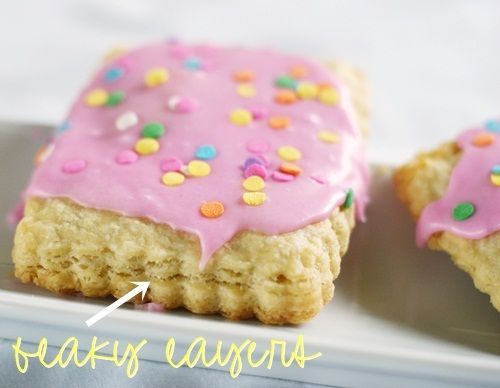
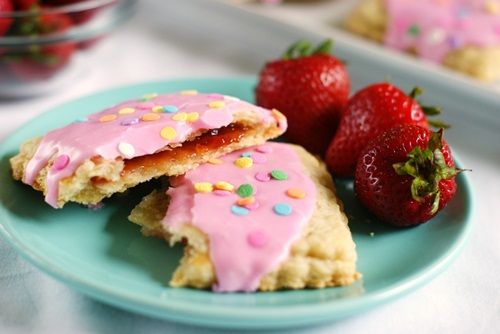
It's like having frosted pie for breakfast.  Just look at those flaky layers.

Do you want one?  I know you do!  How about a $50 Williams-Sonoma gift card to go with it?  

OK....here' s whatcha have to do to enter:
Giveaway closed....congrats to a_manda!!! Look for an email in your inbox!

We're having a BLOGGY SCAVENGER HUNT!

To enter, leave a comment answering the following questions about some fabulous bloggers. (NO PEEKING at the comment above you! The winner will be chosen from the CORRECT entries on Monday, May 23rd at 8pm CST. Be sure to leave a way for me to contact you!!!)
(Giveaway closed....congrats to a_manda!!!)
  1. Teresa from Blooming on Bainbridge has a darling doggy.  What is his name?
  2. Amy from She Wears Many Hats, well, wears many hats.  How many hats is she wearing in her header?
  3. Amanda from i am baker recently made _____________-decorated cookies for the Share Our Strength Bake Sale. (fill in the blank)
Ready....GO!

{This giveaway is not associated with Williams-Sonoma...they only know me as the crazy lady who talks to herself in the store.}