Popular Post

Friday, October 9, 2009

Caramel Apple Bars


Despite the name, these are less like caramel apples and more like cobbler in bar form. :) If you love apple cobbler, you'll love these...my husband has been eating them with a side of vanilla ice cream.

And, oh, your house will smell like grandma's kitchen while they are baking!

You will need to dirty up the kitchen a bit making these. You'll need a mixer, 3 bowls, the food processor, oven and microwave. Don't say I didn't warn you. :)


{This was my favorite part of making them. I ♥ my Peel-away! Do you have one?}

Caramel Apple Bars
(source: adapted from The King Arthur Flour Cookie Companion)

Crust:
1 c brown sugar
3/4 c unsalted butter
1/2 tsp cinnamon
1/4 tsp nutmeg
1/8 tsp allspice
1/8 tsp cardamom
3/4 tsp salt
1/2 tsp baking soda
1 c unbleached, all-purpose flour
1 c ground pecans
2 c rolled oats

Filling:
4 large apples, peeled and sliced (I used Honeycrisp)
1/2 tsp salt
1/2 tsp cinnamon

Topping:
10-12 ounces soft caramels (such as Kraft)
3 TBSP milk

Preheat oven to 440. Lightly grease a 13 x 9" pan. Line the pan with foil and grease the foil.

Beat together the brown sugar through the baking soda until well-blended.


Add in the flour, ground pecans and oats; mix on low until combined. Reserve 1 cup and set aside.

Press the remaining crust into the prepared pan.


Toss the apples with salt and cinnamon. Spread over the crust.


Melt the caramels in the microwave with the milk on half power until melted and smooth. Drizzle over apples. Sprinkle on reserved crust mixture. (You can make your own caramel topping here if you are an over-achiever.)


Bake for 35-40 minutes until caramel is bubbly. Let cool to lukewarm. Lift foil out of the pan and onto a cutting board. Using a bench scraper, cut into squares. Allow caramel to firm up before serving (mine never really did...the bars were soft...definitely fork food).


Related posts:

Hey Sweet Thing! What's Cookin'?

Hi everyone! Happy Friday!!! I didn't think it would ever get here this week. I get my hair cut tomorow morning and I can't wait! I normally get it done every 5 to 6 weeks. This time I think it's been about nine weeks, and I feel like a shaggy sheep dog! It's going to feel so good tomorrow to have all this cut off! Anyway, I put together a quick card tonight with some of the new Magnolia stamps from the Yummy For Your Tummy collection from Magnolia-licious. I am sooo in love with these stamps! They're so adorable, and if you haven't seen them yet, you just have to run over to Magnolia-licious and take a peek! For this card, I used #385 60's Tilda, # 623 60's table, and #629 stove by Alota.
All the stamps were colored with Copic markers and cut out. Tilda is popped up for dimension. Sorry....I noticed I didn't "ground" the stove pipe to the wall, which I fixed after taking all these pics and posting. *smile* I don't know why these things become so obvious after the fact! The frame they're sitting on was cut with my Expression with the Storybook cartridge. That's it for tonight. Like I said, just a very quick card. I tried really hard to add ribbon and a bow, but it was just too much with the large images. So I left it plain and simple. Sometimes that's just the best way to go. What do you think?
Thanks for stopping by to see me todayand hope to see you back again soon! HUGS!

Wednesday, October 7, 2009

Snejana Onopka

Tuesday, October 6, 2009

blog candy winner

Holy smokes, it's Tuesday night and I forgot to pull a winner for my BBTB blog candy! I'm sooo sorry!!! Anyway, went to random.org and pulled a number between 1 and 99 and this is what I got:


Generator

Min:
Max:
Result:
80
Powered by RANDOM.ORG

I don't know why I can't get that thing to copy and paste, but at least the winning number of 80 shows! #80 is Helen!

helen said...
i have been reading so many posts on the mb about coptics and i have seen many of the beautiful cards ...they must be some kind of miracle pens as everything looks fabulous. thanks for the chance to win some candy especially the trick or tereat kind

September 29, 2009 1:51 PM

Congrats Helen! Please send me your address so I can get you candy out to you!
Hugs!

Don't hate me because I'm BOO-tiful!


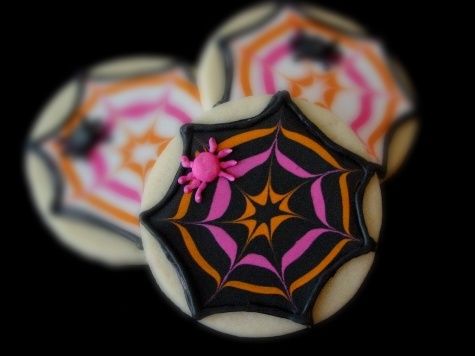
October has to be my favorite cookie decorating time of year.

The pumpkins, the candy corns, the spider webs...oh my!

These cookies are some of my favorites...sassy little spiderwebs in bright pink and orange. No special cookie cutter required, any size round cutter will do.


Here's how to make them:
  • Outline a spiderweb shape in black royal icing using a #2 or #3 tip (AmeriColor Super Black).
  • Thin black, pink and orange icings with water to the consistency of thick syrup (AmeriColor Deep Pink and Orange). Cover with a damp dishtowel and let sit several minutes.
  • Stir gently with a rubber spatula to pop any air bubbles that have formed on top. Transfer thinned icings to squeeze bottles.
  • Working 6 - 8 cookies at a time, fill in the outlines in black, using a toothpick to spread into corners.
  • On top of the wet black icing, pipe on the thinned pink and orange icings in alternating circles.
  • Drag a toothpick through the icing, starting at the middle, towards the points to make a spiderweb pattern.
  • Let dry at least one hour.
  • Using piping consistency (non-thinned) icing , pipe spiders on the webs using a large plain tip for the bodies (such as a #7 or #12) and a #1 or #2 for the eight legs.
  • Let dry overnight.


Related posts:

Remind me not to save any owls, anytime soon.

This from Acid Cow.

So a great horned owl was found walking on the side of a freeway, in the middle of somewhere. Some people discovered him, scooped him up, put him in a cardboard box, took a photo of him and moved him to state park.

This picture says one thing to me, and one thing only.
Be very afraid.

Another kitchen must-have. . .Works For Me Wednesday

Do you own an offset spatula?


For years, I ignored cookbooks and cooking shows recommending offset spatulas.

"Why do I need one of those when I have a table knife?"

Well, it turns out, they were right, I was wrong. Something about that little offset spatula makes life so much easier...


whether it's icing a cupcake....


spreading dough for caramel brownies....


or smoothing a layer of cheesecake.

Mine is considered a mini, I think. About 4.5 inches and perfect.

They're not expensive, either. Treat yourself! You deserve one! :) It certainly works for me.


Related posts: